Getting started with Twitch
Jun 16, 2020
A quick guide to some of the settings for Twitch channels, including screen caps, and brief descriptions/explanations of the important ones. Keep scrolling till you see: “This is the end. Turn back now!”
Let’s dive in!
Channel Settings
The following options are found on your channels dashboard at: https://dashboard.twitch.tv/u/**channelName**/settings/channel – but replace **channelName** with your actual channel name.
The following sections are largely in order. There are a few options on channel pages that aren’t visible to the public – at least at time of writing – so I have moved those to the end of this section. But you should basically be able to scroll down this document and the dashboard at the same time and see them in the same order.
Store Past Broadcasts
Do you want to keep your broadcasts as VoDs that can be watched back? You need to have this setting turned on if you want to create highlights from your streams. Highlights are available forever and can be a great resource to share and grow your channel, just like clips created during your live stream.

Enable Clips
Speaking of clips, you’ll want to turn this on too. This lets both you and your viewers make short clips of funny or interesting moments of the stream when it is live – they can be up to 60 seconds long and given a title.

Latency Mode
Just turn this on.

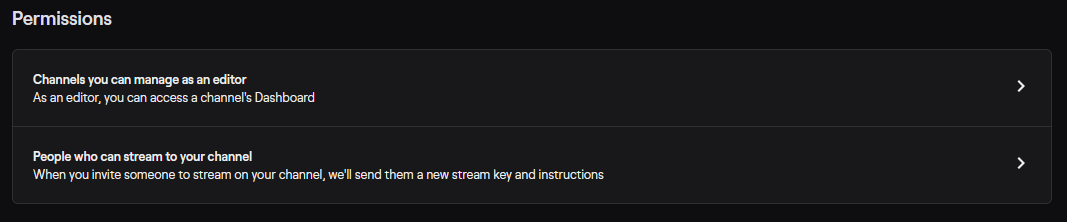
Permissions
This section lets you see on which other channels you are listed as an editor (see the Channel Roles section for more details). It also shows which accounts are authorised to stream directly to your channel without having to hand out your login credentials – use this with extreme caution as your account is liable for any violations these streams may commit whilst broadcasting on your stream.
Profile Picture
It’s you in a circle, it shows up on your profile and in the sidebar when you’re live. You should make it identifiable as you.
Profile Banner
This all but replaces the offline banner after the new Twitch profile update.
The video player that we see when a streamer is offline is now relegated to the last tab on the profile in preference to the new, and let’s be honest, far better Home tab.
This is similar to Twitter or Facebook profiles, with a large banner image at the head of the page giving you a good chunk of screen real estate to show off your branding and give visitors – old and new – a taste of who you are. By default, Twitch will generate a low opacity text of your username over the image. Use this until you set something yourself, which you should do as the generated ones are a bit lame.
So the setting looks like this:

And looks like this in the wild:
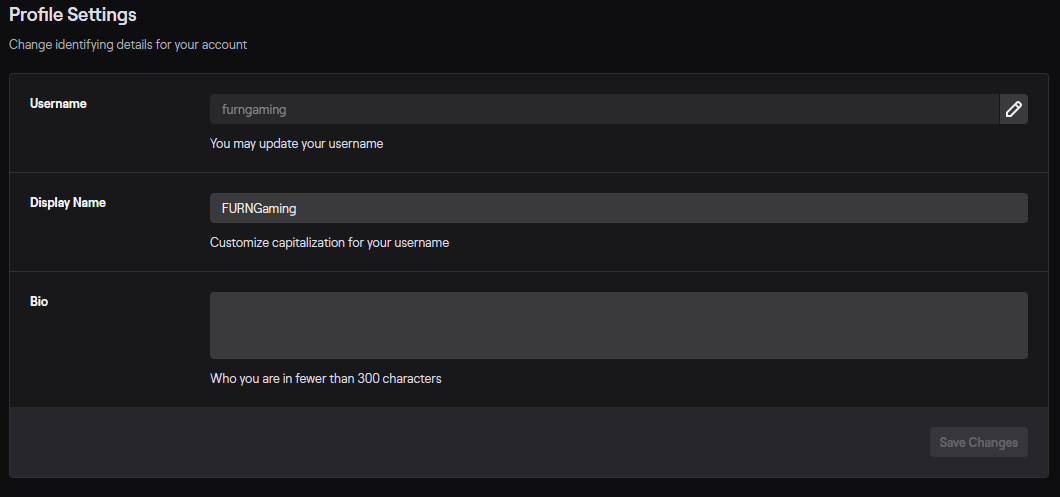
Profile Settings
Great for changing how your name is displayed on your channel page. We capitalised the first part of our name which is lower case in the username.
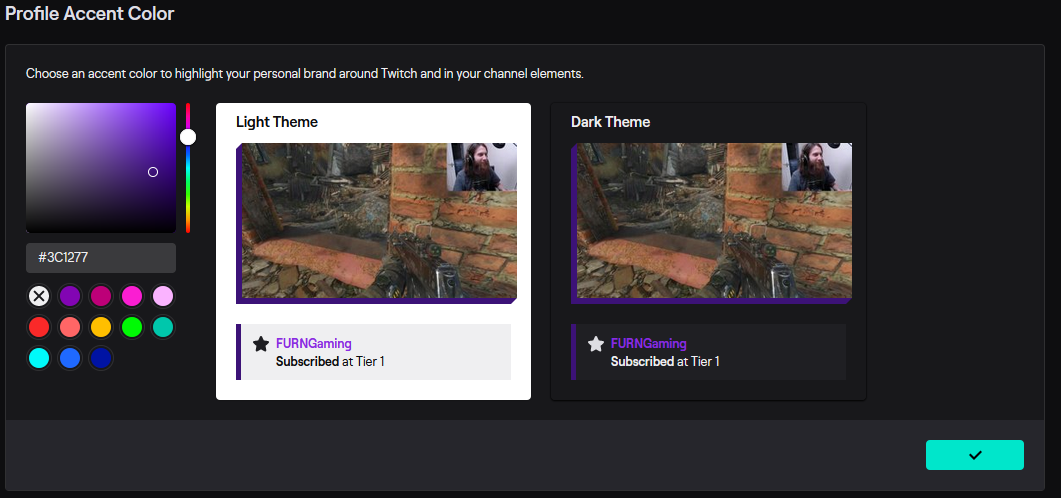
Profile Accent Colour
This one has been on the settings page for a while but never really played a massive role; that’s changed with the recent Twitch profile update. The accent colour you pick now shows as a solid block under videos on your profile whilst they are hovered over, and also acts as a solid fill colour for the rest of your profile below the banner, so it’s worth trying to blend them as well you can.
The settings page gives you a preview of what your chosen colour will look like in both Light and Dark themes, which saves you having to switch between them yourself to check.
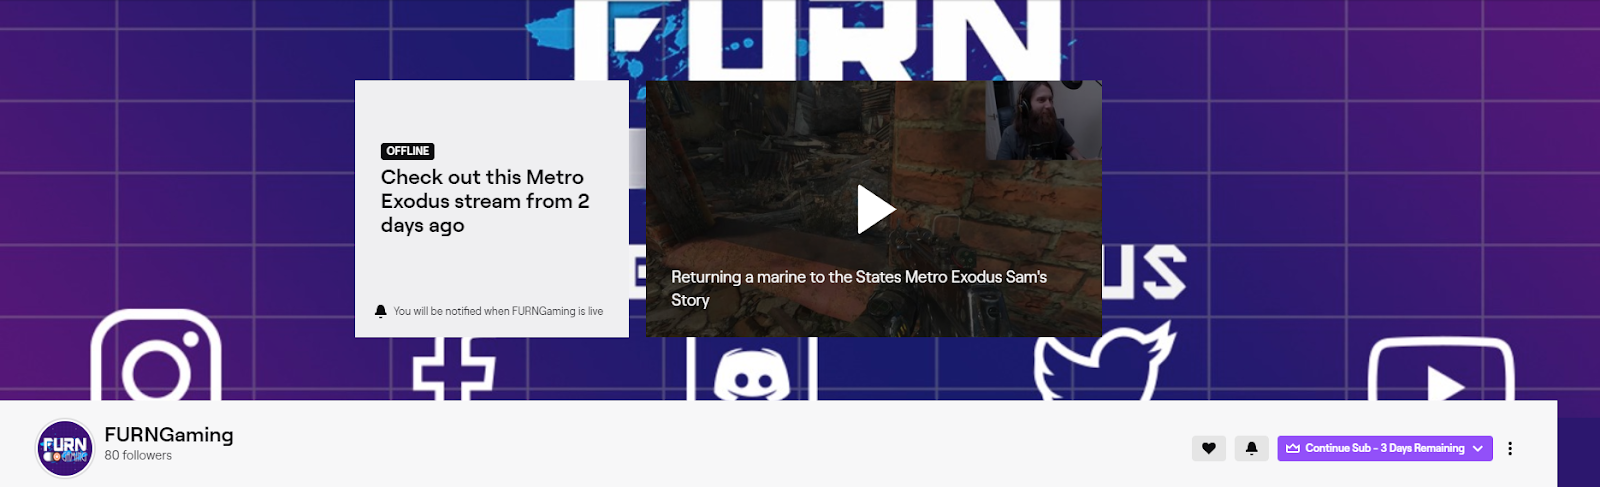
Video Player Banner
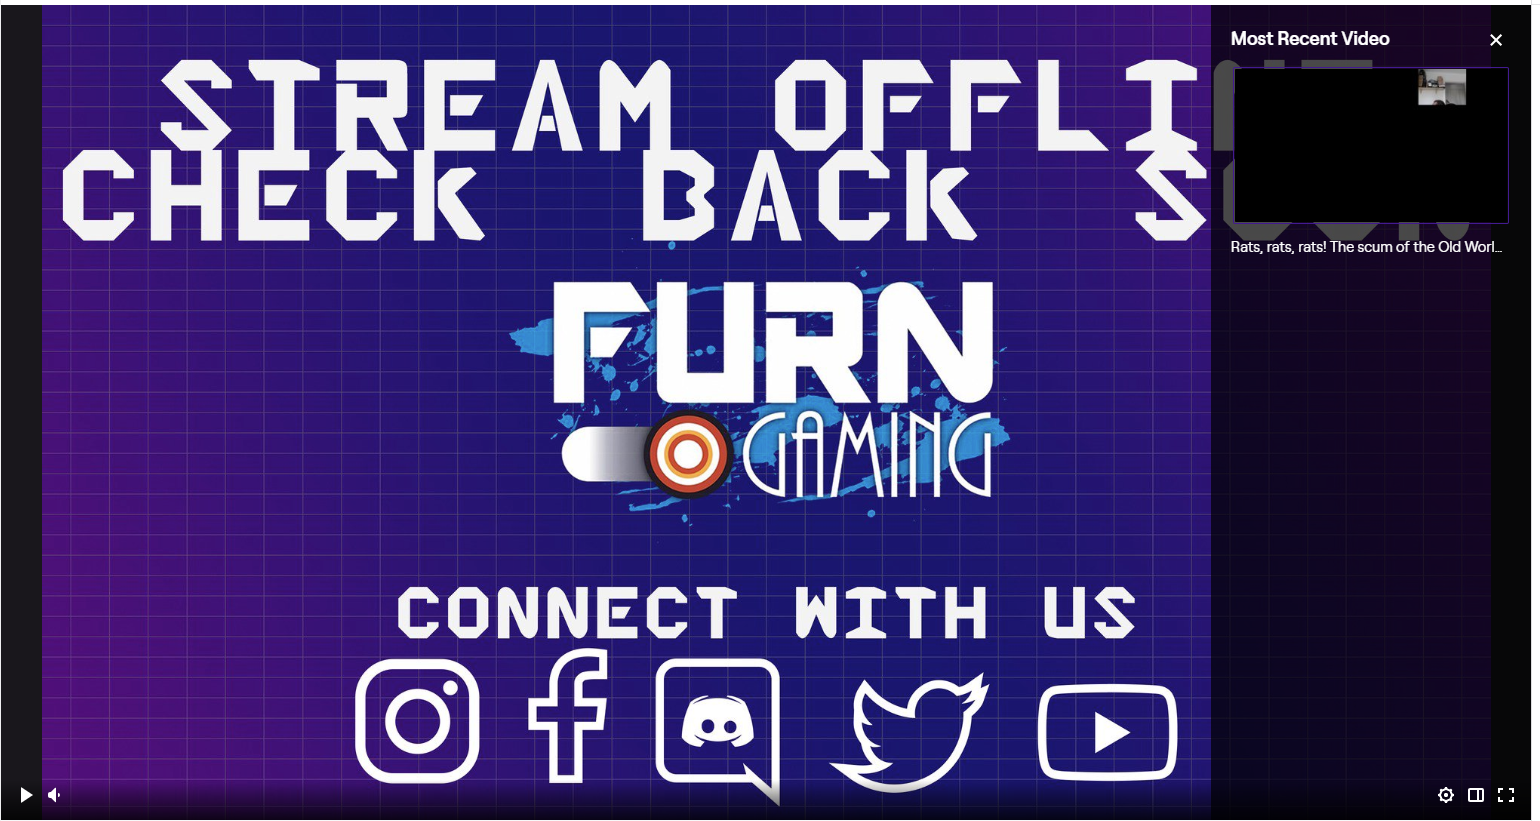
Also known as the Offline banner, this is the image that’s shown in your video player when you are offline and no one on your auto host list is streaming. Adds a little life to the page and can be a good little branding spot.
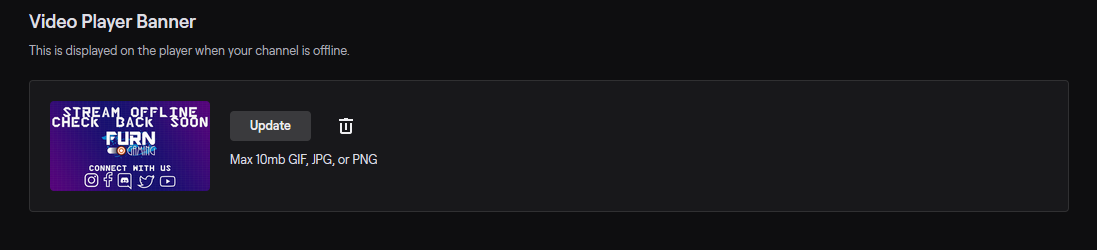
Looks like this:
Channel Trailer
This is another new feature from the Twitch profile update that lets you upload a video of up to 60 seconds to the head of your profile. This will be shown to visitors of your profile whilst you’re offline and lets them know what your channel is all about, when you’re online, and where else to find you.
The Twitch example suggests including some clips from your stream, along with some talking-head-style footage for this to give the viewer an idea of what to expect from your stream.

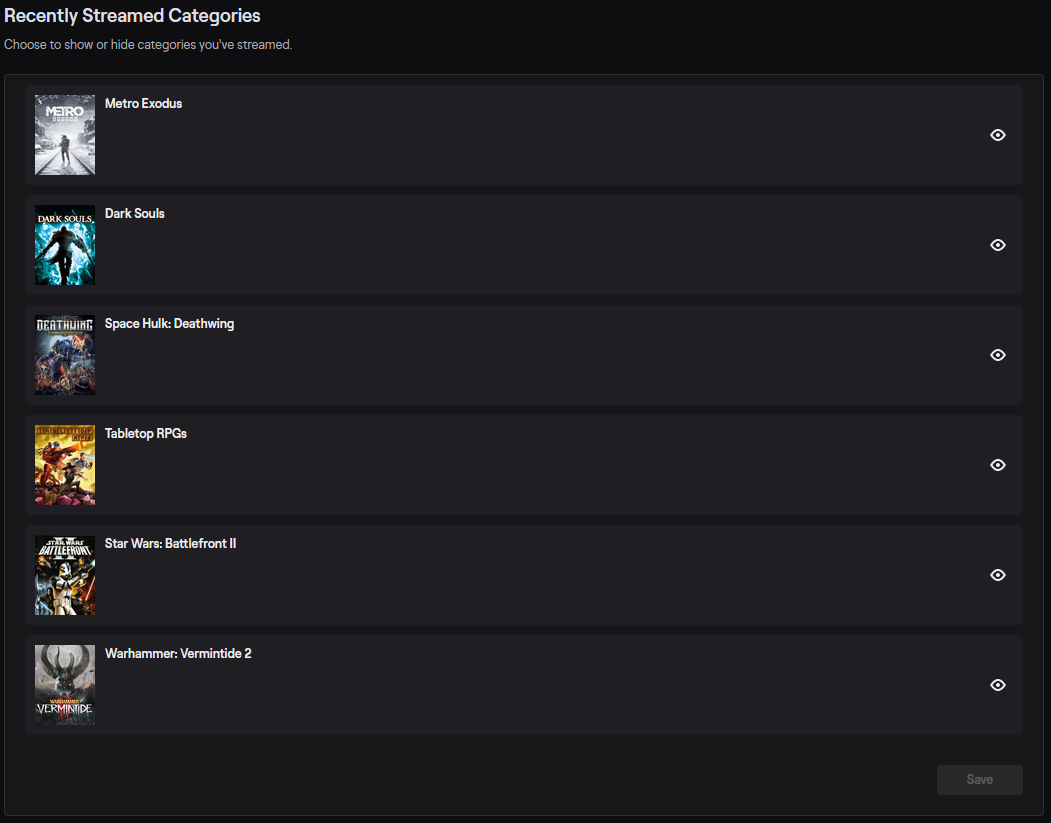
Recently Broadcast Categories
With the recent update, when you’re offline the main home tab of your profile lists a number of things: the last handful of VoDs, the categories you’ve recently streamed, and other streamers you recommend.
But you can hide any or all of those recently streamed categories using the settings panel, just click the eye to hide.
Social Media
Does what it says on the tin. (Ronseal please don’t sue me, I can’t afford it!)
This:
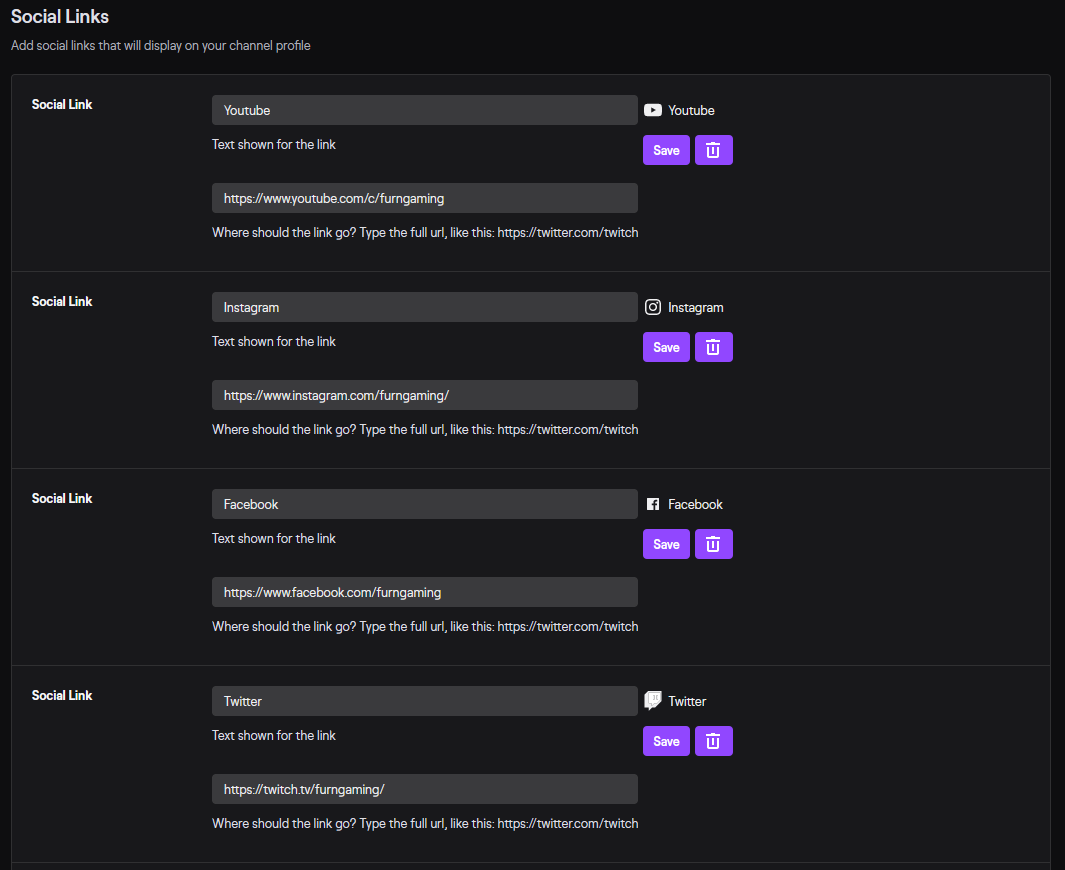
Gives you this:

I’m not sure what level of automatic icon support they have built in, but it is safe to assume that they will support all the major social networks that we’ve been using for years!
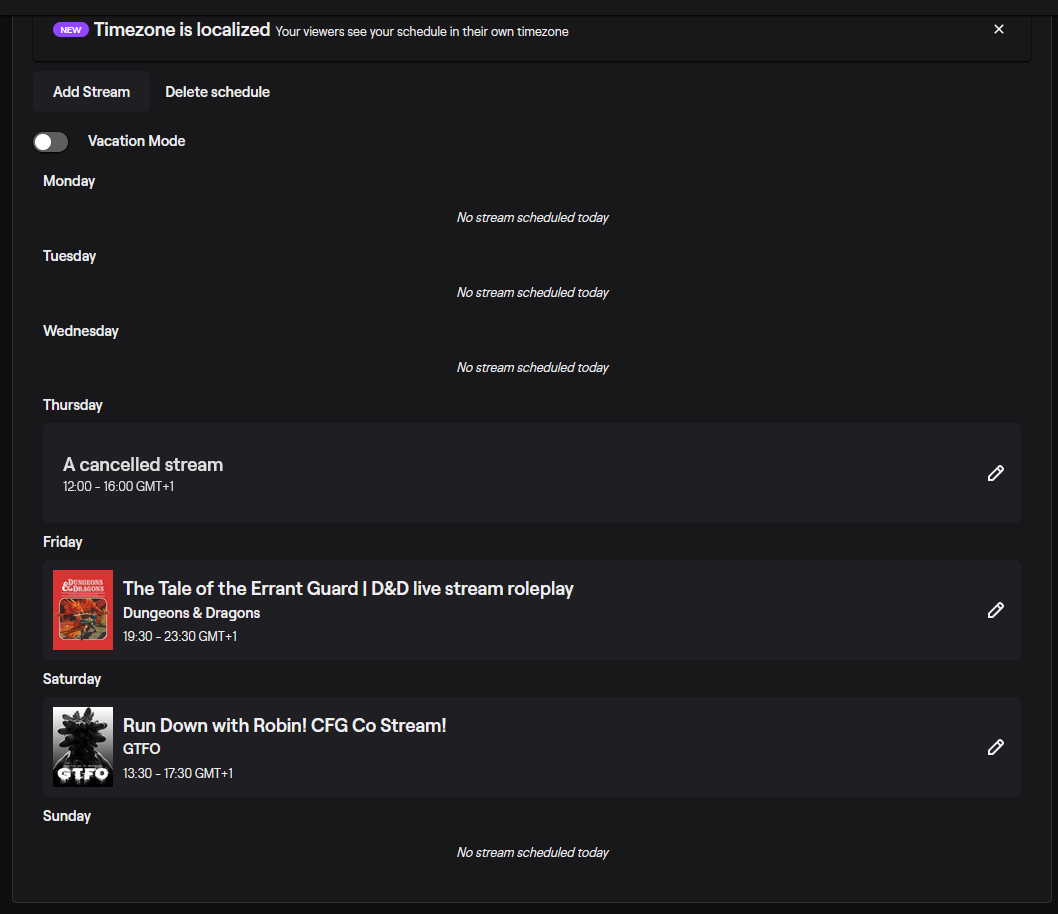
Stream Schedule
If you’re planning on using your Twitch channel regularly, this is a great feature that’s recently been added. It shows when you’re going to be streaming, what you’ll be streaming, and for how long. Previously, streamers would either have a graphic or use an external service to do this. This also lets you set multiple streams for a single day, which is something some of these external services didn’t account for; so another nice feature from our friends in the Twitch dev team.
When adding a stream to your schedule the times are based on your current time zone but are automatically translated for your viewers, so no more back-and-forth to convert timezones!
A few things I’ve found out whilst writing this:
- If you press enter whilst in the box, it will reset the selected time to 12:00am, so just click out of the box once you’ve put in your time.
- Once you’ve added a stream to the schedule, you can edit and change all the details. This will make it a lot easier for variety streamers who frequently change games but not time slots.
- You can mark a stream as cancelled (by editing it once it’s been added) if something comes up and you’re not able to stream. At the expected time, viewers will see that you’ve marked the stream as cancelled which should reduce confusion, but it’s still worth communicating this via your socials too.
- The time selector doesn’t like the 24 hour time format, it takes 7:30pm, but not 19:30.
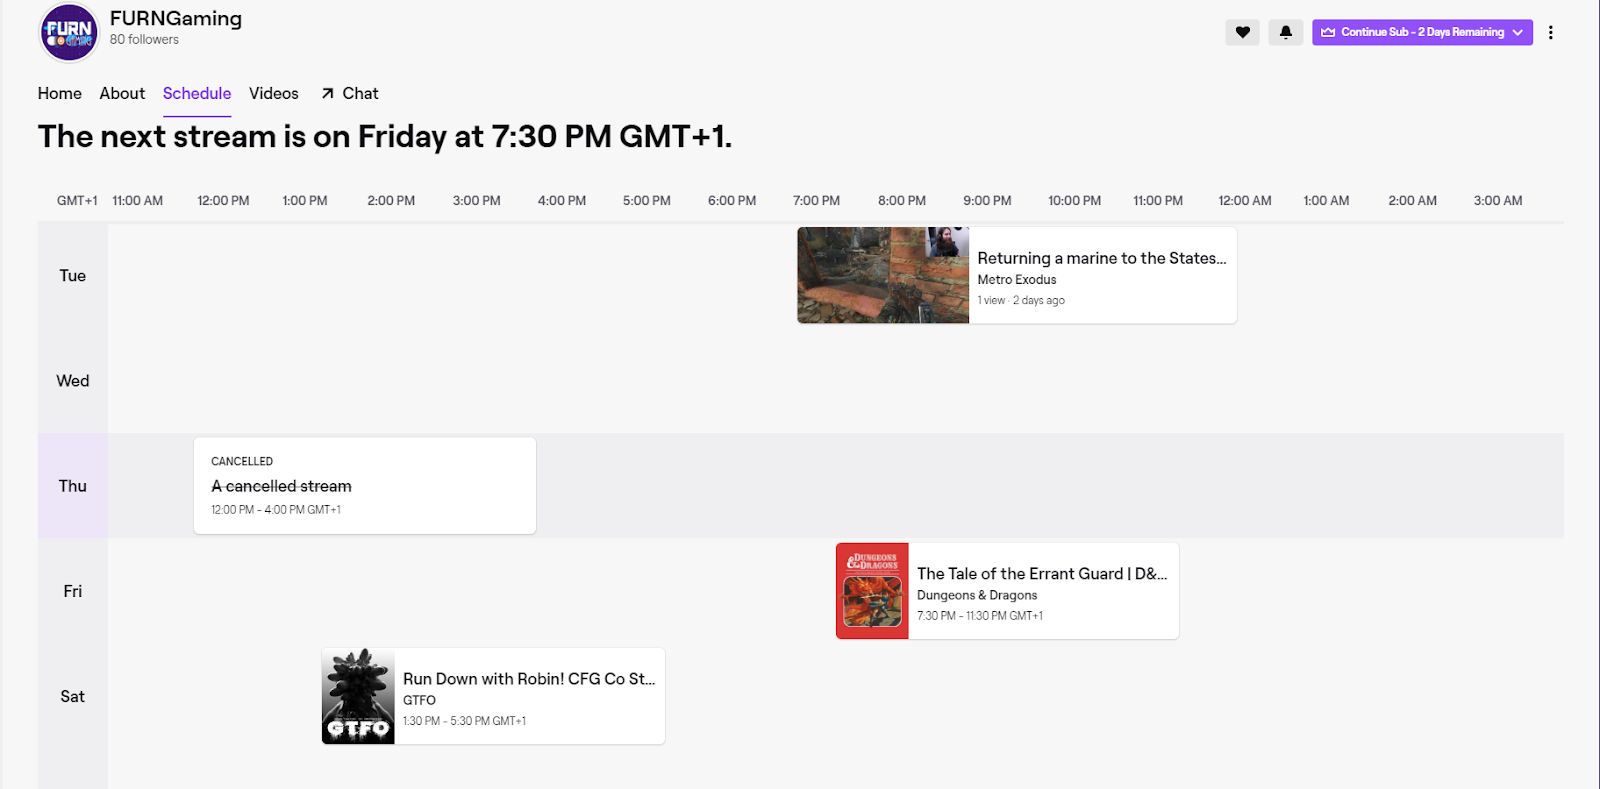
This all shows up on it’s own tab on your profile, with all the upcoming and recently broadcast streams you have set! And yes, the past broadcasts on your schedule do link to the VoD (if you have Store past broadcasts enabled!)
So this:
Shows up like this on your profile, very cool!
My Streamer Shelf aka Auto Hosting
Really useful feature on Twitch that plays another person’s stream on your channel when you are offline. Simple to set up too!
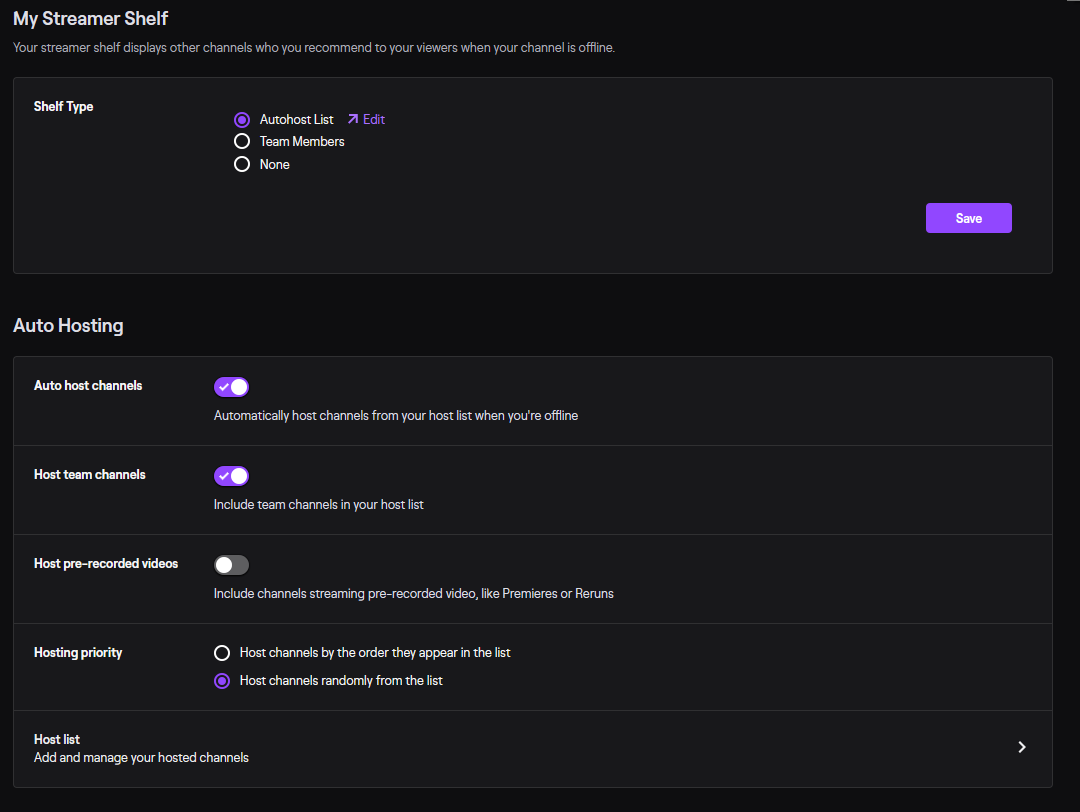
Check ‘Auto host channels’, then edit your autohost list, you’ll need the other channel’s name to do this. There is a search/autocomplete function, but copying and pasting the channel name does speed this up.
After the update, your autohost list now also doubles as your ‘recommended streamers’ list. Your recommended streamers are shown on your profile’s Home tab – this is in the order that they are shown in your autohost list, whether you have hosting priority set to Order or Random, so the order you have them in now makes a difference.
The rest of the options should be fairly self-explanatory, but drop me a line if you have any questions.
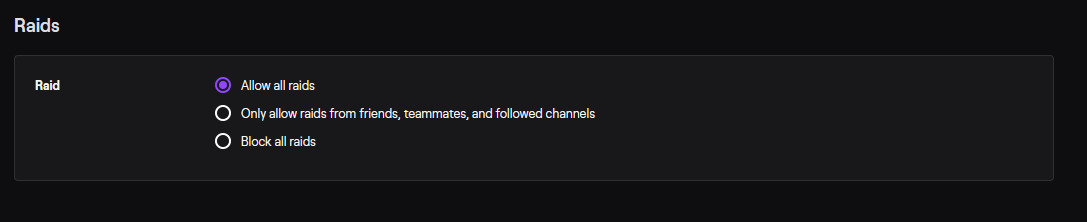
Raids
A raid on Twitch refers to when one streamer, who is about to go offline, takes or sends all their current viewers to another stream as a big group, and the viewers don’t need to do anything! It’s a great way for groups of streamers with overlapping streaming times to support each other and boost viewer numbers.
So on the same page as above, check ‘allow all raids’ – I don’t currently see any reason why you would use the second option.
Drops
I’ve yet to actually play a game or watch a stream where this has happened, but the concept is that whilst watching a stream of a game for which the developer has enabled Twitch Drops, the viewers can receive in-game items for just watching the stream.

Moderation Settings
Head to https://dashboard.twitch.tv/u/**channelname**/settings/moderation – like before, put your actual channel name in the right spot, yeah? Solid!
By and large these are all pretty obvious and the settings will come down to how you want to run your chat, how busy it is going to be, and how many moderators you’ll have at any given time. The rule of thumb I’ve heard banded about is 2 per 100 chatters, but as far as I’m aware there is no limit on how many moderators you can have, so don’t sweat it!
That said, let’s hit some of the options.
AutoMod
This is Twitch’s built-in chat police – for lack of a better phrase.
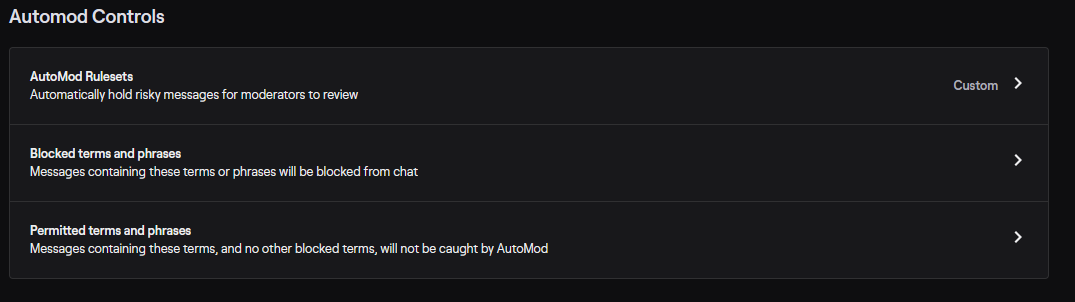
It comes with several predefined, default ‘levels’, basically how ‘adult’ do you want to let the chat be. And yes, this will asterix out swear words if you don’t turn that off!
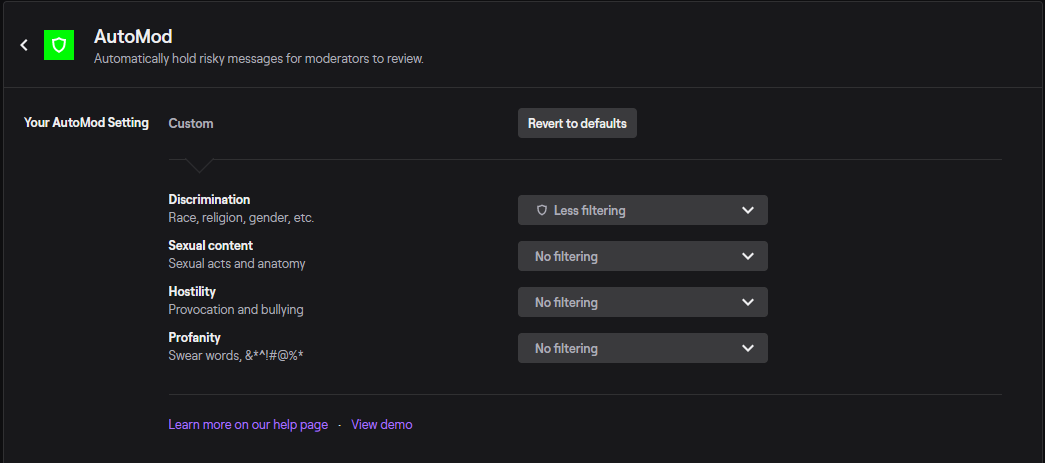
We run a channel that is not afraid of swearing and our users know it, so we have our AutoMod dialed back about as far as you can without turning it off. Bare in mind this is basically a computer program that’s been tuned by scanning millions (billions?) of messages over the years. Again, these settings come down to personal preference so I’ll just leave it there.
The blocked terms and phrases option lets you finetune these rules for your channel and override the AutoMod default settings, regardless of how you have it set. If you really hate one specific swear word or phrase and never want to see it in your chat, block it. If you know one phrase that usually gets blocked but really shouldn’t, permit it.
Chat Options
Again, they’re pretty well labeled here. The big one here is ‘non-mod chat delay’. For moderators, the chat is never delayed and they will see messages as they are posted.
However you can increase the time before said messages are visible to the rest of your viewers, to give moderators a little longer to delete any offending messages before they are visible.
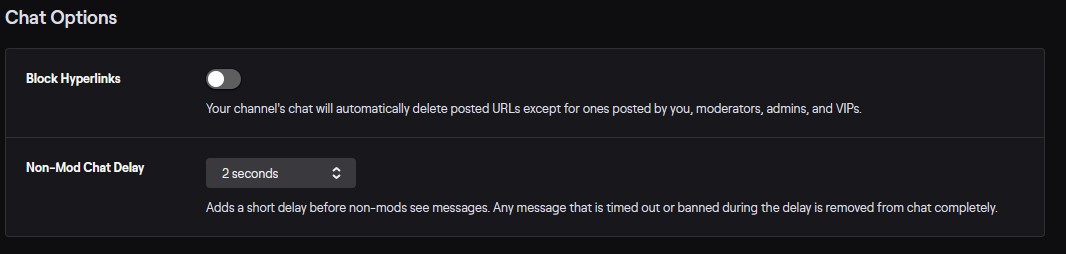
*we stopped blocking URLs as it became a pain in the arse when our viewers were trying to send us something when we were just chatting with them. We have mods in chat at all times so can remove any offending links that do get posted.
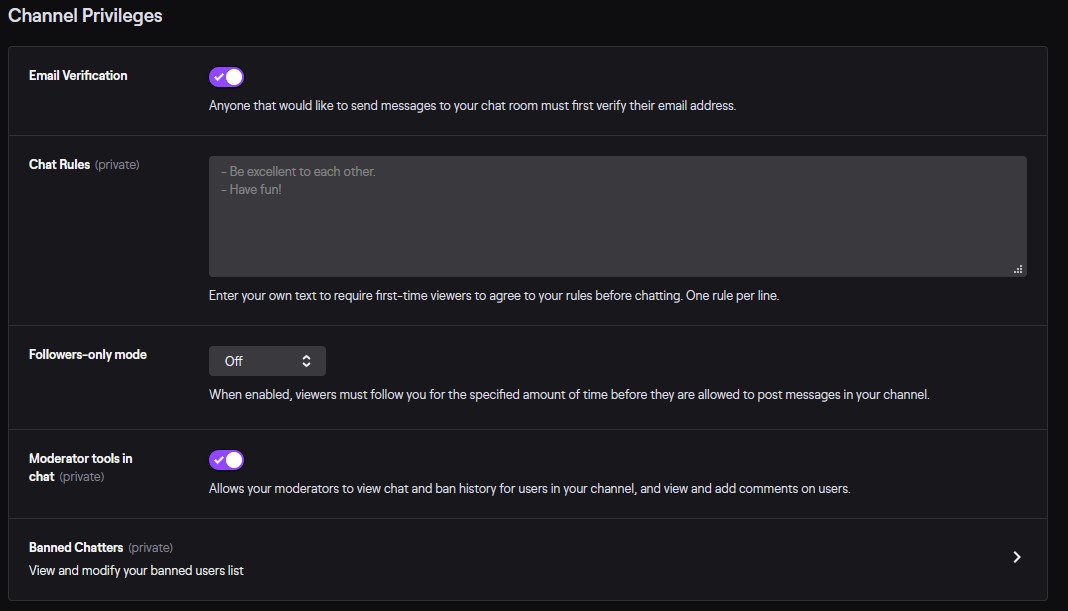
Channel Privileges
The first option is a great way to avoid spam bots, they never verify their email address so I highly recommend it.
Chat rules is a message that’s posted at the top or bottom of the chat when a user joins for the first time. It requires them to press a button to be able to type, and it’s a good way to set the etiquette expectations – no one can argue they didn’t know the rules when they’re banned for being a cockwomble!
Followers-only mode is great for big channels, as it reduces the mass of messages and forces people to follow you to chat – you probably don’t want to use this.
Mod tools in chat are super useful. Turn this on.
Banned chatters == douchebags
Channel Roles
“Nathan, you keep talking about mods but how do I do that?” Good question voice in my head, here’s how!
Twitch, in their infinite wisdom, has all community roles in a section of its own, so you can’t set or see a list of your channel moderators from the moderation settings page – c’est la vie!
https://dashboard.twitch.tv/u/**channelName**/community/roles – you know what to do by now.
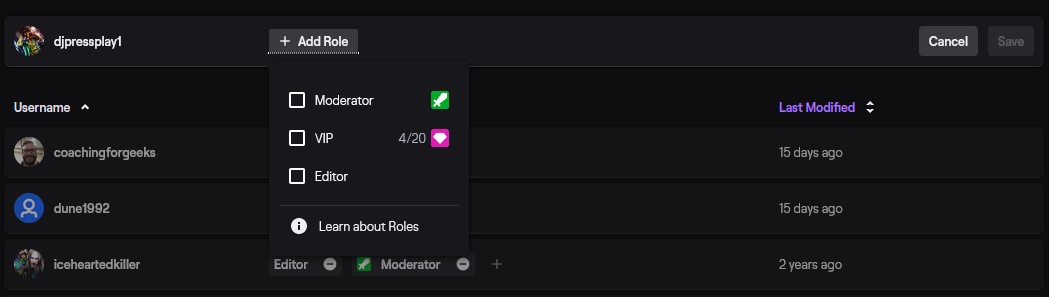
So you’ve got a big ol’ blank page to start with, but once you’ve got some more people in here you can filter the list to show just one role, which can be handy when you’ve got a big list. But first just hit add new.

And you’ll get something like this:

Start typing in the user’s name that you wish to bring onboard. Similar to the autohost list, this search engine has autocomplete, but be careful as there are a lot of similar usernames out there.
Once you’ve picked a user, you can select a role to give them from the dropdown list – VIP is an affiliate/partner option, so don’t worry about it not being there when you look!
When in chat, Moderators can show off their superpowers with the little sword icon next to their name – see mod chat tools above – and can moderate chat for you (duh!) by removing offending messages, posting links if you’ve got URL blocking turned on, and banning users that step over the line too far or too often.
Editors can access some of the dashboard pages, but far fewer than the person logged in as the channel. I had to log in as the channel to get these screenshots, as I couldn’t access 99% of the options or pages as an editor of the channel!
They do get access to the Stream manager page where they can change the stream’s title, category, go live message, amongst other things that Mods cannot. With greater power comes greater trust!
Well that’s it folks… or is it?
Well, yes and no! There is much, much more that can be done when managing a Twitch channel – from customising the buttons on the Stream Manager page, to adding panels on the stream page, to chat bots – but that’s outside of the purview of a get started guide, and I wouldn’t want to overload you with everything all at once.
I have been Nathan Lucking, Tech Goblin of FURNGaming, and it’s been my pleasure to write this little guide for you. I hope to see you on stream in the not too distant future!
If you’ve got any questions, you can find me on Twitter at @iamaxis feel free to DM me.
Now…
This is the end. Turn back now!
Grab a free guide on how to grow your stream or podcast from scratch. Or perhaps a guide on creating your social media content?
